Wednesday, June 22, 2011

Chicken Biryani


Looks like I am on a dedication spree. The credit for this recipe goes to my darling husband. A delicate blend of spices to make an aromatic and light flavoured rice and chicken. Make a vegetable or boondi raita and your sure to steal the show. Thanks for sharing this Flav. And Gody hope you try this out! :)


Ingredients... (Serves 5-6)
For Marination
1 Kg Chicken 
1 Cup Curd 
1 Tsp Turmeric powder
2 Tsp Chilli powder
1.5 Tsp Salt

For Masala/gravy
4 Tbsp Oil
3 Cloves
4 Cardamom
1 inch piece Cinnamon
3 Onions (finely chopped)
1 Tomatoes (finely chopped)
2 Tsp Biryani or Meat Masala
3 cups Basmati Rice

Here's what to do...
Mix the chicken, curd, turmeric, chilly powder and salt in a bowl and marinate covered for about 2 hours (overnight in the refrigerator is best).

Heat oil in a pan, add cloves, cardamom, cinnamon and fry till the cinnamon changes color.

Add onions and fry till golden brown. Add tomatoes and biryani masala and fry till the mixture appears uniform and turns reddish orange in color.

Now add the chicken and cook the mixture on a medium flame till the chicken is half done (should be able to poke it easily with a fork).

Wash the rice and add 3 cups of water in a rice cooker. Add the entire chicken curry mix from above in the rice. Mix well and allow it to cook for about 20 min. There will not be any gravy left; just the masala.

Your biryani is ready.

Tips and Garnishing...
To make it more authentic, add fresh mint leaves while preparing the chicken masala (add along with the tomatoes). And finally when the biryani is done, garnish with fresh coriander.

If you do not

have a rice cook, use a pressure cooker or a cooking pot with lid and follow the same procedure.

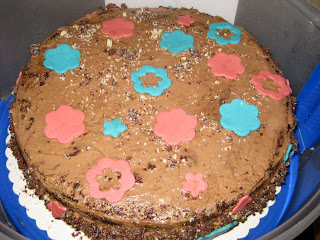
Brazilian Chocolate Cake with Nutella icing and chocolate plastic flowers

Sharmi this post is especially for your mum! :)

This I baked a few months ago for a friend's surprise baby shower.

Brazilian chocolate cake + Nutella Icing + Chocolate plastic flowers

+ coarsely crushed nuts of your choice

Cut the edges of the cake so that it is smooth and even. Do not throw the extra pieces. Crumble and save for later. Divide the cake horizontally to have two parts. Spread a generous amount of icing to sandwich the two parts and then spread the remaining over the top and sides of the cake.Sprinkle the cake crumb and some crush nuts of ur choice on the side of the cake.

The Plastic chocolate was quite a pain I must say. I had planned to abandon my trusted marzipan and decided to make a tasty baby cradle out of chocolate plastic. The plastic sure tasted great but working with it was very very difficult. In the end I did what I do very often... When plans don't work, IMPROVISE. Since we didn't know if the baby was 'blue' or 'pink', I made flowers of the two colours to keep the guessing mode on.

The result was decent in appearance but great in taste. Soft, creamy, lightly chocolately! :)


Monday, June 20, 2011

Cakes and toppings... and my online baking recipe books


A close friend recently mentioned to my husband 'your wife is a super woman. She always gets everything right!' On that note I have to say that I so far I have only put up posts and pictures of the things I have managed to do decently well. The credit for all that perfection goes to all the failed experiments and the insight they bring. Sometimes things go exactly as planned, sometimes they fail terribly. We have eaten half baked cakes, burnt dosa's, seen ugly looking crafts, broken our head about what could have possibly gone wrong till we finally figured out the 'right' way. It sure does take long to find perfection... though not forever! :)


Coming to cakes and toppings... Many of my friends who have mastered the art of baking suggest that one must find a good cake recipe book to get the basic recipes right. So as I set on my quest for one, I came across this blog. Pamela has done an excellent job of reviewing different recipes and posting them. I have been mixing and matching the icing and cakes from this blog and others to come up with yummy combinations. Videojug and youtube are other great sites to visit. 

This is the Black Forest Cake I baked recently on my husband's birthday. 


Look out for more posts on other baking delights. 

Wednesday, June 1, 2011

Maize Cake

I am back to blogging after a long break. So I thought lets revoke some sweet memories from the time I was away. This recipe was shared by my friends from Afghanistan in my German language class. The recipe is simple & light and makes a great tea/coffee time snack. If you don't indulge in evening coffee or tea like me, simply give the cake your undivided attention and relish a slice or two.


You need:
1 cup vegetable oil (I used Olive oil)
1 cup sugar
1 cup milk
1 1/2 cups Maizeflour (Yellow flour. It is not the same as the white cornflour used for thickening soups and sauces.)
1 tsp Elaichi/Cardamom powder
1 1/4 cups Maida/All purpose flour (If you want to make a super healthy version, use whole wheat flour instead)
2 Eggs
1 tsp baking powder

Beat the eggs, oil, milk and sugar in a bowl. Now add all the dry ingredients through a sieve (to avoid forming lumps) into the liquid mixture. Beat the mixture well for few minutes till smooth. Grease a cake tin and add in the mixture. Bake in microwave oven or regular oven for 45 minutes at 180 to 200 C (temperature setting depends on type of oven).
Cake is now ready.... The aroma of maize and cardamom very tempting.... But wait... let the cake cool for at least an hour before you dig in! ;)