Wednesday, December 7, 2011

Date and Walnut cake with Marzipan Xmas icing


I wanted to get into the mood of the Christmas season and I thought what better way to start than a Christmasy looking cake. I decided to try this recipe. I used cranberries instead of raisins. It tasted delicious. But there was way too much fruit and I couldn't enjoy the cake as much. I would recommend that you follow the original recipe with the following changes...
80 grams walnuts
30 grams raisins/cranberries

For the decor I used white marzipan* and green and red food colours. Roll out the green marzipan and cut out the leaves. Make small balls from the red marzipan for cherries. Roll out the white marzipan to make two circular sheets with even edges. Place over the cake loaf as shown in the picture. Arrange the leaves and cherries. Just one more step...... EAT THE CAKE! :D

*Marzipan recipe in my next blog.

'Mock' Ragda pattice (serves 4)


So the story of the mock ragda starts here. I was craving to eat some chaat and wanted to treat my husband to something he hadn't tasted before. Now since I didn't have white peas at home, which is the main ingredient in the original ragda I came up with this quick-match-the-original version! I loved the result!!!

For the pattice: (Makes 12)
4 large boiled and mashed potatoes
1 tsp ginger garlic paste
1 tsp garam masala powder
1 tsp turmeric powder
1 tsp chilly powder
1 teaspoon crushed coriander seeds
11/2 teaspoon chaat masala
1 teaspoon lime juice
salt to taste
handful freshly chopped coriander leaves
handful freshly chopped mint leaves
2 tbsp oil

Add all ingredients to the potatoes and mix well. Divide the dough into 12 equal balls and flatten each to form a patty. Shallow fry in oil. Keep aside.

For the 'mock' ragda:
1 tbsp oil
1 tsp jeera seeds
chopped garlic
pinch of asafoetida/ hing
1/2 tsp turmeric powder
1 tsp onion powder (optional)
1 tsp coriander powder
1 tsp jeera powder
1 tsp garam masala powder
1 large bowl green peas
half cup boiled yellow moong dal
2 tbsp besan/ gram flour

For the sweet chutney:
1 handful of tamarind deseeded
50 grms dates deseeded
100 grms jaggery
1 tsp fennel seeds/ saunf
4 cups water

Boil all the ingredients for about 10 minutes or until all the ingredients have melted to form a smooth paste. Remember to stir occasionally. You might need to strain the pulp of any fibre from the tamarind.

For the garnish:
1 large chopped onion
chopped coriander
nylon sev
'sev puri' puris

Place the pattice on a plate. Pour radga over it. Pour some sweet chutney. Sprinkle some chopped onions, sev and crushed puris. And its time to treat the tummy...

Wednesday, June 22, 2011

Chicken Biryani


Looks like I am on a dedication spree. The credit for this recipe goes to my darling husband. A delicate blend of spices to make an aromatic and light flavoured rice and chicken. Make a vegetable or boondi raita and your sure to steal the show. Thanks for sharing this Flav. And Gody hope you try this out! :)


Ingredients... (Serves 5-6)
For Marination
1 Kg Chicken 
1 Cup Curd 
1 Tsp Turmeric powder
2 Tsp Chilli powder
1.5 Tsp Salt

For Masala/gravy
4 Tbsp Oil
3 Cloves
4 Cardamom
1 inch piece Cinnamon
3 Onions (finely chopped)
1 Tomatoes (finely chopped)
2 Tsp Biryani or Meat Masala
3 cups Basmati Rice

Here's what to do...
Mix the chicken, curd, turmeric, chilly powder and salt in a bowl and marinate covered for about 2 hours (overnight in the refrigerator is best).

Heat oil in a pan, add cloves, cardamom, cinnamon and fry till the cinnamon changes color.

Add onions and fry till golden brown. Add tomatoes and biryani masala and fry till the mixture appears uniform and turns reddish orange in color.

Now add the chicken and cook the mixture on a medium flame till the chicken is half done (should be able to poke it easily with a fork).

Wash the rice and add 3 cups of water in a rice cooker. Add the entire chicken curry mix from above in the rice. Mix well and allow it to cook for about 20 min. There will not be any gravy left; just the masala.

Your biryani is ready.

Tips and Garnishing...
To make it more authentic, add fresh mint leaves while preparing the chicken masala (add along with the tomatoes). And finally when the biryani is done, garnish with fresh coriander.

If you do not

have a rice cook, use a pressure cooker or a cooking pot with lid and follow the same procedure.

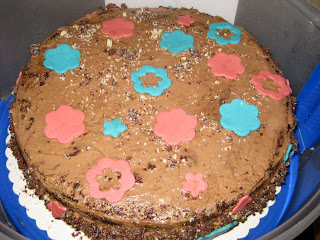
Brazilian Chocolate Cake with Nutella icing and chocolate plastic flowers

Sharmi this post is especially for your mum! :)

This I baked a few months ago for a friend's surprise baby shower.

Brazilian chocolate cake + Nutella Icing + Chocolate plastic flowers

+ coarsely crushed nuts of your choice

Cut the edges of the cake so that it is smooth and even. Do not throw the extra pieces. Crumble and save for later. Divide the cake horizontally to have two parts. Spread a generous amount of icing to sandwich the two parts and then spread the remaining over the top and sides of the cake.Sprinkle the cake crumb and some crush nuts of ur choice on the side of the cake.

The Plastic chocolate was quite a pain I must say. I had planned to abandon my trusted marzipan and decided to make a tasty baby cradle out of chocolate plastic. The plastic sure tasted great but working with it was very very difficult. In the end I did what I do very often... When plans don't work, IMPROVISE. Since we didn't know if the baby was 'blue' or 'pink', I made flowers of the two colours to keep the guessing mode on.

The result was decent in appearance but great in taste. Soft, creamy, lightly chocolately! :)


Monday, June 20, 2011

Cakes and toppings... and my online baking recipe books


A close friend recently mentioned to my husband 'your wife is a super woman. She always gets everything right!' On that note I have to say that I so far I have only put up posts and pictures of the things I have managed to do decently well. The credit for all that perfection goes to all the failed experiments and the insight they bring. Sometimes things go exactly as planned, sometimes they fail terribly. We have eaten half baked cakes, burnt dosa's, seen ugly looking crafts, broken our head about what could have possibly gone wrong till we finally figured out the 'right' way. It sure does take long to find perfection... though not forever! :)


Coming to cakes and toppings... Many of my friends who have mastered the art of baking suggest that one must find a good cake recipe book to get the basic recipes right. So as I set on my quest for one, I came across this blog. Pamela has done an excellent job of reviewing different recipes and posting them. I have been mixing and matching the icing and cakes from this blog and others to come up with yummy combinations. Videojug and youtube are other great sites to visit. 

This is the Black Forest Cake I baked recently on my husband's birthday. 


Look out for more posts on other baking delights. 

Wednesday, June 1, 2011

Maize Cake

I am back to blogging after a long break. So I thought lets revoke some sweet memories from the time I was away. This recipe was shared by my friends from Afghanistan in my German language class. The recipe is simple & light and makes a great tea/coffee time snack. If you don't indulge in evening coffee or tea like me, simply give the cake your undivided attention and relish a slice or two.


You need:
1 cup vegetable oil (I used Olive oil)
1 cup sugar
1 cup milk
1 1/2 cups Maizeflour (Yellow flour. It is not the same as the white cornflour used for thickening soups and sauces.)
1 tsp Elaichi/Cardamom powder
1 1/4 cups Maida/All purpose flour (If you want to make a super healthy version, use whole wheat flour instead)
2 Eggs
1 tsp baking powder

Beat the eggs, oil, milk and sugar in a bowl. Now add all the dry ingredients through a sieve (to avoid forming lumps) into the liquid mixture. Beat the mixture well for few minutes till smooth. Grease a cake tin and add in the mixture. Bake in microwave oven or regular oven for 45 minutes at 180 to 200 C (temperature setting depends on type of oven).
Cake is now ready.... The aroma of maize and cardamom very tempting.... But wait... let the cake cool for at least an hour before you dig in! ;)


Monday, April 4, 2011

Mango and Avocado Rice


A ripe Avocado in the fridge looked at me with a big happy smile and said 'You got to use me today!" And so I decided to pair it with some fresh spring onions and mango pulp. The result? Aromatic pulao enjoyed by our friends who spent the day with us watching the cricket World Cup 2011 finals. And since India turned out champions that night this recipe will always remain extra special. This recipe serves 8 hungry stomachs.

1 tablespoon olive oil
1 tspoon ajwain seeds (also called bishops weed)
7 spring onions chopped
2 tspoons ginger garlic paste
2 tspoons paprika powder
2 tspoons black pepper powder
1 tspoon dried parsley
1 tspoon dried oregano
1 tspoon balsamico
3 tablespoons mango puree
1 well riped avocado mashed
salt to taste
6 cups of basmati rice

Wash and cook rice. Keep aside to cool. To speed up the cooling process spread the rice on a large plate. (The rice needs to be cooled to prevent the grains from breaking when mixing.)

In a pan heat oil and add ajwain. Once they turn brown and you get a good aroma add the chopped spring onions. Saute well. Once soft add the ginger garlic paste, paprika and pepper and mix well. Now add the mango, avocado and the remaining herbs, i.e. parsley, oregano, balsamico and salt. Mix well and cook covered over medium heat for about 4 minutes with 1/4 cup water.

Add the cooked mixture to the cooled rice and mix well till every grain is coated. Serve warm.

Natural colour for rice


Are you tired of serving white rice all the time? Are you looking for a simple idea to make your simple pulao look exotic? I believe that the appearance of any delicacy I serve is as important as the taste. I stumbled upon this idea accidentally a couple of months ago when cooking rice in my rice cooker and steaming beet root in the steamer over the same rice cooker. 

You could add bay leaves, cloves and cinnamon to the rice when boiling. Peel the beetroot and cut into pieces and place on the steamer. The red colour from the beetroot will fall over the rice. Let the rice cool down to room temperature and then gently mix it well to get the effect as in the attached photograph. Hmmm so what do you do when you don't have a rice cooker with a steamer? You could use a regular cooker and place the beetroot over a plate with holes. For example, plates used to make idlis. Or you could boil the beet separately and pour some of the coloured water over the rice. Wait for the rice to cool and then mix it roughly.

White Sauce for Pasta

This a simple white sauce recipe for pasta which is completely vegetarian and alcohol free. For non-vegetarians you could add pieces of any meat of your choice. Here's the recipe:

Ingredients: serves 4
2 tbspoons butter/ margarine
1 cup maida/all purpose flour
1 cup milk
pepper
salt
Petersillie
Powdered garlic
Oregano
Vegetables of ur choice (brocolli, carrots, mushrooms, zucchini)
2 tablespoons Grated Paneer
Any pasta

In a non-stick pan heat butter. Once melted add maida. Mix well. This will have formed some lumps by now. Add the milk and keep stirring till the lumps are gone. (Or add little maida at first then some milk and little more maida and alternate till all the maida and milk is added and well mixed.) Now add all the spices and herbs to taste. Finally add all the vegetables and cook well till vegetables are soft but crunchy. Don't forget to add the grated paneer and cook for a couple more minutes.

Boil any pasta in hot water or as instructed on the packet. Drain out the water. Run them through cold water to prevent them from sticking.

Serve.


Monday, March 21, 2011

Paneer-Mango Masala


Come summer and I get reminded of the great Indian Mango. This year will be the second summer in a row that I will have missed a yummy bite of the Alphonso. I will make do with the mongo pulp from the Indian store or other fresh Mangoes that come from other parts of the world. For those of you who have a wider choice pick your favourite mango and add a special flavour to this Paneer Mango Masala!

You need:
Grated paneer
Rings of 1 onion
1 tablespoon of ripe Mango slices
Brocolli
2 tsps of Sambhar masala
Turmeric
1 Garam masala
Slices of ginger
Powdered garlic
1 ½ cup whey/ water
1 tablespoon Tomato puree

Refer to my blog on "Homemade Paneer-Indian Cheese" to learn how to make Paneer at home. If you are in a hurry then you could buy Paneer from a store.

Get your ingredients ready and get started. Heat oil in a nonstick pan. Saute the onions well till soft.

Add in turmeric, ginger, garlic, sambhar and garam masalas and tomato puree. Mix well and add in the brocolli. Cook covered on medium flame with a little water so the brocolli is soft.

After about 3 to 4 minutes add the mango slices and paneer. Saute well and cook for few more minutes. If you like the masala to be a little wet then add in water. You might need to cook for about 5 more minutes before you turn off the flame.

You could serve this with dosa, roti or use it as a stuffing for puffs.

Homemade Paneer - Indian Cheese


1.9 litres whole milk
1/4 cup lemon juice
Sieve
Thin cotton cloth/handkerchief
Salt to taste
1 tsp Dried mint - powdered
1 tsp Paprika powder

Bring the milk to a boil. Add the lemon juice slowly while stirring the milk in a circular motion. The milk will start curdling at this point. Turn the stove off. Take a sieve and cover it with a cotton handkerchief. Place this over a deep vessel. Pour the curdled milk over the sieve to collect the paneer. Tightly knot the ends of the cloth so that all the water oozes out. You could also place a heavy vessel on the paneer (which is on the sieve).

Do not discard the whey (the water that remains). It can be used as stock for cooking rice, gravies, soups, etc.

Once most of the whey oozes out add the spices, knead the paneer well. You could use this grated paneer as a stuffing. If you want cubes of paneer then put it back into the cloth, place some weight over it till all the whey is gone and you get a soft but firm block of paneer. Cut into cubes and use.

I haven't tried refrigerating it so far. Once I do that I will post some tips. Till then enjoy this freshly made paneer!! :)

Friday, March 11, 2011

Wat-A-Melon!!! More than just water...

Plot: One of our usual 'arguments' (my husband likes to call them 'fights' to make them sound dramatic!) at home.
Cause: The juicy, beautiful, delicious Waaaterrrrrmelon!!
Question: Why not just drink water instead of taking the trouble to cut a watermelon and play kabaddi with the seeds which ultimately tastes like flavoured water???

For those of you who have had the same question, you might want to give it a rethink.
Here's why:
http://home.howstuffworks.com/watermelon3.htm
http://www.watermelon.org/
 
And now with summer around the corner, Watermelon's might be safely rated "hu-man's best friend"!

Have you ever tried pickling the rind of watermelons or finding a way to turn them into a tasty main course? Do you know how to turn the seeds into tasty chai-time snacks? Please do share them.


Thursday, March 3, 2011

Maahshi


Two of my friends from my German language class and I meet once a week to cook and eat together, to better our German speaking skills, to learn about each others cultures and to simply have fun! One comes from Afghanistan, one from Kurdistan (from North Iraq) and one from India. Maahshi is a speciality from Kurdistan and for this recipe a big thank you to Ashena. She also says that every Kurdish dish has meat in it. And I say its has loads of love and fat! ;)

For the meat and vegetables:
2 Zucchinis
1 Brinjal
2 + 2 Tomatoes
2 Capsicum/ Bell peppers
2 + 2 Onions
2/3 dried whole lemons
3 tablespoons Tomato Puree
Raisins - handful
Minced meat

1. Remove the flesh from the vegetables (Zucchini, 2 Tomatoes, Bellpeppers and Brinjal) and keep aside.
2. In a pan, shallow fry raisins, minced meat, flesh from the vegetables and 2 finely chopped onions in oil for 5 minutes.
3. Fill the mixture from step 2 into the vegetables in step 1.
4. In a mixing bowl take tomato puree, 2 cups of water, salt and pepper and mix well.
5. Take a deep large size cooking pot. Slice 2 tomatoes and 2 onions and place them at the bottom of the pot. Over the slices place the stuffed vegetables. Then pout the tomato puree mixture over the vegetables and cook for approximately 30 minutes over medium flame.
DO NOT mix the contents of the pot at any time since it will break the vegetables.

For the rice:
3 cups Jasmine rice (or of your choice)
Oil
Salt
Water
1- 2 cups Pasta of different shapes and colours
Raisins

1. Wash and cook the rice with some oil, salt and water.
2. In another pan cook the pasta with some oil, salt and water.
3. Garnish the rice by arranging the pasta roughly over rice.

Serve the stuffed vegetables from the first recipe with the rice and pasta preparation with some freshly cut salad.

Friday, February 18, 2011

When dreams blossom...

I kept myself away from the Laptop and the internet for more than a day due to infection in both my eyes. And this was the result. Made with paints, silver foil, paper and some soothing acapella in the background, my dreams wait to adorn a wall! :)))

Friday, February 11, 2011

Our childhood favourite - salted moong dal - with a twist :)


My husband had just returned from work when I was half way into preparing this and he asked, "Can we actually make 'moong dal' snack at home???" And if you are wondering the same, Yes! you definitely can!!

2 cups of split moong dal (soaked for about 2-3 hours and drained)
1 tbsp oil
2 tsp saunf/ fennel seeds - crushed roughly
Chaat masala/ Bhel puri masala - to taste
Salt - to taste
Red chilli powder to taste
1 cup dessicated coconut

Maintain medium heat for the entire process. In a non-stick pan heat oil and fry the fennel seeds till they change colour slightly. Add the soaked and drained moong dal into the pan and fry them till they become crisp and lose most of the water. Keep mixing the dal at regular intervals. Yes this process needs a little patience but its worth the effort when you know you will eat something fresh and homemade and also alter the taste to suit your needs.

How will you know that the moong dal is done? When mixing it in the pan you will notice the sound of the dal against the pan has changed. It will sound like stones against metal. Also the colour of the dal will change from dark yellow to light. This process will take around 20 minutes. Now add the dessicated coconut, salt, and masalas. Mix for a minute and turn of the heat. Ready to munch munch munch...

Poha Chewda


I tried it once and it turned out great. And now I have every reason to make it over and over. Hope you think the same. :)

You need:
1 tbsp - vegetable oil
1 tsp - mustard seeds
1 tsp turmeric powder
Few slices of chopra/ dried coconut
1-2 cups of your choice (groundnuts, cashewnuts and raisins taste best)
Few curry leaves
2 green chillies chopped
Chat masala
3 cups fine/medium poha
salt to taste
1/2 cup sugar

Heat oil in a pan over medium fire. Add mustard seeds. Once they splutter and the sound stops, add turmeric powder, curry leaves, green chillies and nuts (except raisins) and coconut and fry them till the chillies become crisp. Now add the salt and chat masala, poha and mix well. Fry the ingredients and toss them regularly till the poha becomes crisp. Finally add the raisins. Turn off the stove. Wait for the chewda to cool, add the sugar and mix one last time.

Yummy चिवडा मिनिटों में ready!

Friday, February 4, 2011

Play on...


In my personal and professional quest to understand our global society a little more I have been researching about play and games. I don't mean just games that children play but also the ones that youth and adults engage in or engaged in traditionally. In India we play games during weddings, during community gatherings, during free time with our families or friends, etc. Story telling is also a wonderful form of play. And different societies and cultures tell stories differntly. My mum used to tell me how as children they would look forward to the enactment of the Dassera story during the festive season.

In a day and age where play is losing its priority, this blog hopes to create nostalgia and a drive to evoke the child in us.

I want to invite anyone reading this post - age, sex, nationality no bar - to share about play time in your family, community, or any other place. Games you played which are not played anymore. Pen your own experiences. Ask your parents and grandparents if you are fortunate to have them with your still. Ask your children what they play.

Play on....